Spicy Veggie Soup

Spicy Veggie Soup

Veggie soup is always such an easy, flexible meal to throw together and it’s especially nice because you can basically make it with any veggies you have in the fridge. I really nailed it with this combination of vegetables and spices but you can easily swap out anything I used for another veggie you may have laying around.

Processed with VSCO with c1 preset

This recipe makes a ton of soup so I would anticipate to have a lot of leftovers if you make it. The good news is, it keeps really well in the fridge and re-heats nicely because I didn’t add any noodles or rice directly into the soup when cooking. I would highly recommend making noodles, rice or quinoa on the side and adding them in when you reheat the soup. That way, they won’t get all soggy and break down in the fridge.

Processed with VSCO with c1 preset
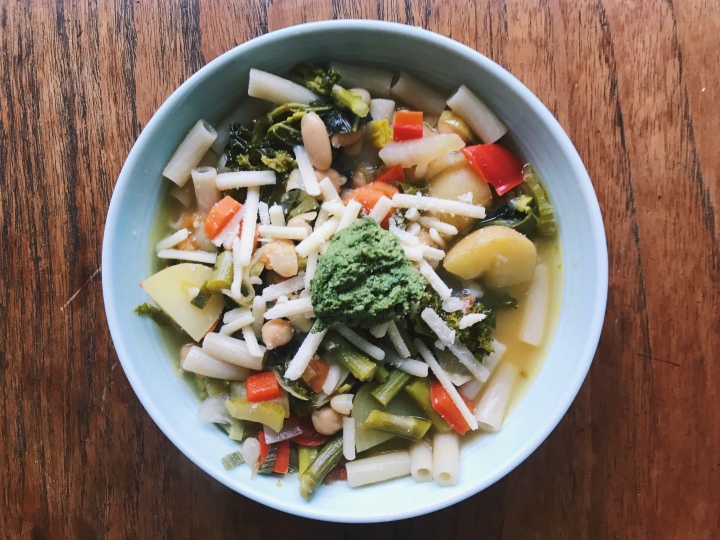
I made this last Sunday and we had it for lunches and dinners throughout the week. It’s a very hearty soup and isn’t super brothy, which I prefer because it’s more filling. It was amazing with a bit of pesto and vegan cheese or nutritional yeast on top.

Spicy Veggie Soup (Prep Time: 30 min. Cook Time: 30 Min. Serves: 8)

Ingredients:

  • 2 Tbsp. olive oil
  • 1 yellow onion, diced
  • 4 carrots, sliced
  • 4 stalks celery, diced
  • 3 cloves garlic, minced
  • 4 roma tomatoes, diced or one can diced tomatoes
  • 1 red pepper, diced
  • 1 cup asparagus, cut into 1 inch pieces
  • 1 green pepper, diced
  • 1 leek, diced
  • 4 small yellow potatoes, cubed
  • 3 cups, kale cut up, stems removed
  • 1 tsp. red pepper flakes
  • 2 tsp. Italian seasoning
  • 8 cups vegetable broth*
  • 1 can cannellini beans, drained
  • 1 can garbanzo beans, drained
  • Salt & Pepper to taste
  • 1/4 cup basil, chopped (optional)
  • Cooked noodles, rice or quinoa (optional)
  • Pesto sauce, vegan cheese or nutritional yeast for topping (optional)

Instructions

  1. In a large pot, head olive oil over medium high heat. Add in onion, carrots, and celery and sauté for a few minutes until they start to sweat and soften a bit. About five minutes.
  2. Add in garlic, diced tomatoes, red pepper flakes, and Italian seasoning, salt and pepper and sauté two or three minutes until tomatoes cook down a bit.
  3. Add red and green peppers, and leek and sauté one or two more minutes.
  4. Pour in broth and bring to a boil. Once boiling, add potatoes, asparagus, and both cans of beans.
  5. Reduce heat to medium, medium-low and simmer until potatoes are soft. About fifteen minutes.
  6. Turn off heat and stir in kale and basil.
  7. Pour over cooked rice, quinoa or bullion and top with pesto, nutritional yeast or cheese. Enjoy!

For broth I use vegan bullion and dilute it according to the package’s instructions, it tends to be much cheaper.*

My Favorite Marinara Sauce

This weekend, Josh and I did a belated Valentines day dinner. Last year for Valentine’s day I made us a a non-vegan Italian dinner but since we switched to a plant-based diet this year, that was no longer an option. Pasta 1.JPGI did some digging around and found The Minimalist Baker’s Eggplant Lasagna Roll-Ups. They are filled with a tofu based, vegan ricotta and nestled in marinara sauce. I cannot recommend her recipe enough, and if you are looking to make a delicious, date-night meal I would highly suggest trying it. I pretty much followed her recipe exactly but I served the roll-ups with pasta and a salad I did make my own marinara sauce.

Pasta 2.jpg

Marinara is a simple recipe in terms of ingredients but, for it to taste best, it does need to simmer for a while. The longer you cook it down, the more the flavors come together. If I have time, I will even make the sauce the night before I need it and put it in the fridge overnight. It’s honestly surprising how much more flavorful it gets as you let it sit.

It is one of my favorite recipes and I’ve been making it for years. Every time I make Italian food, this is my go-to sauce and I am really excited to share the recipe.

Ingredients (Prep Time: 10 min. Total time: 40 Min. Serves: 5):

  • 2 tbsp. olive oil
  • 1 medium yellow onion, diced
  • 4 cloves garlic, minced
  • 1 tsp. dried oregano
  • 1/2 tsp. crushed red pepper (optional)
  • 29 oz. can crushed tomatoes
  • 14 oz. can tomato sauce
  • 1/2 tsp. sugar (coconut sugar or agave would work also)
  • 1/3 cup fresh basil, chopped
  • 1/3 cup fresh parsley, chopped
  • salt and pepper to taste

Instructions: 

  1. In a large saucepan heat olive oil over medium heat. Once hot, add in onion and sauté until softened (about 5 minutes).
  2. Add in garlic, oregano, crushed red pepper and cook until fragrant and garlic softens.
  3. Reduce heat to low, add crushed tomatoes, tomato sauce and sugar. Stir and let simmer for at least 25 minutes (up to an hour if you have time)* stirring every once in a while to make sure nothing is sticking to the bottom of the pan.
  4. Stir in chopped basil and parsley and let sit for 5 minutes.
  5. Put this sauce on whatever your heart desires, dip bread in it, have it plain with pasta, or use it for a fancy schmancy date night meal.

*The longer you can let the sauce simmer the better. If I have time, I will let it simmer for an hour. It lets the sauce thicken and the flavor develop.


Thai Curry Soup

Thai Curry Soup

Thai Curry is one of my favorite foods. I love how rich it is and how all of the spices give it a great depth of flavor. It’s my go-to every time I go out for Thai Food and I especially love it in the winter.

Last week, Chicago got hit with a ridiculous amount of snow. It gave me a good excuse to hang around the house and have a lazy weekend. It was also perfect Curry weather so I decided to trudge over to the grocery store and try to perfect a recipe I have been working on for a while. Good news is, hauling 3 huge bags of groceries (I got a bit carried away at the store) home in an unshoveled mess was worth it because I absolutely nailed this recipe! I am really excited to share it since it is so delicious.

Nutritionally, this soup is also slightly more balanced meal than traditional Curry. Adding broth stretches out the coconut milk and lightens things up a bit. Coconut milk is full of healthy plant-based fats, but I think everything is best in moderation. There are also tons of vegetables in here and rice noodles add some carbs to the meal. If you want to add a bit of protein to it you could totally throw some baked tofu in as well or add it on top at the end.

Processed with VSCO with c1 preset

Thai Curry Soup (Prep Time: 15 min. Cook Time: 30 Min. Serves: 6)

Ingredients:

  • 2 Tbsp. coconut oil
  • 1/4 cup red curry paste
  • 2 inch chunk ginger, peeled
  • 4 cloves garlic, skin removed
  • 3 Tbsp. soy sauce (gluten-free if you have an allergy)
  • 1 Tbsp. brown sugar or coconut sugar
  • 1 Tbsp. sesame oil
  • 2 Tbsp. lime juice
  • 6 cups vegetable broth*
  • 2 (14 oz.) cans of full-fat coconut milk
  • 1 cup button mushrooms, sliced
  • 4 baby bok choy bunches, sliced
  • 2 green peppers, julienned
  • 1 medium red onion, sliced thin (save a bit as garnish)
  • 1 medium sweet potato, cut into 1 inch cubes
  • 1 (8 oz) package vermicelli rice noodles
  • 1/4 cup cilantro, roughly chopped
  • 1/4 cup basil, chopped (optional)

Instructions

  1. In a food processor or high speed blender, blend together curry paste, ginger and garlic until combined.
  2. In a large pot, over medium heat, melt coconut oil. Once melted, add in curry paste mixture and sauté until fragrant, stirring constantly, about 2 minutes.
  3. Add in soy sauce, brown sugar, sesame oil, and lime juice. Stir until combined and then add in vegetable broth and coconut milk and allow it to come to a simmer.
  4. Once simmering, add in sweet potato, onion and green pepper, cook for 5 minutes.
  5. Add in baby bok choy, and mushrooms and simmer for another 2 minutes until they are slightly softened.
  6. Add in uncooked noodles and boil according to package instructions (usually 2 or 3 minutes) and stir in cilantro and basil.
  7. Top with extra basil, cilantro, red onions or green onions and enjoy!!

For broth I use vegan bullion and dilute it according to the package’s instructions, it tends to be much cheaper.*