Cherry Almond Dipped Biscotti

Cherry Almond Dipped Biscotti

I, like the majority of this country, have spent the last few days extremely anxious about the election. I have been trying to keep myself as busy as possible today and decided to bake a copious amount of cookies to snack on as the results start to come in this evening.

This recipe is fairly simple, has ingredients that you most likely already have in your pantry, and can be easily modified depending on what flavors you like. If you’re not a fan of dried fruit you can absolutely omit the dried cherries or try subbing them for cranberries.

The key is to be a bit patient and keep a close eye on the cookies as you bake them. In the first bake, you want to be sure that you pull them out when the top is just barely turning brown. That way, they can be easily cut into slices without falling apart. You will also want to slice the biscotti almost immediately while the dough is still very warm. This ensures that they cut easily and do not crumble as you transfer them back to the baking tray.

As for the second round of baking, I have found that it is a very fine line between a perfectly crunchy biscotti and a burnt one so be sure to watch them and pull them out when they turn a nice golden brown.

These pair perfectly with coffee for a morning treat or with tea or milk for dessert.

Ingredients: (Prep Time: 20 min. Bake time: 40 – 45 min. Makes around 30 biscotti:

  • 3 cups Bob’s Red Mill 1 to 1 gluten-free flour
  • 1/2 tsp. baking soda
  • 1 tsp. baking powder
  • 1/2 tsp. salt
  • 1 tsp. cinnamon
  • 4 eggs
  • 1/3 cup packed brown sugar
  • 3/4 cup granulated sugar
  • 1 tsp almond extract
  • 1 tsp vanilla extract
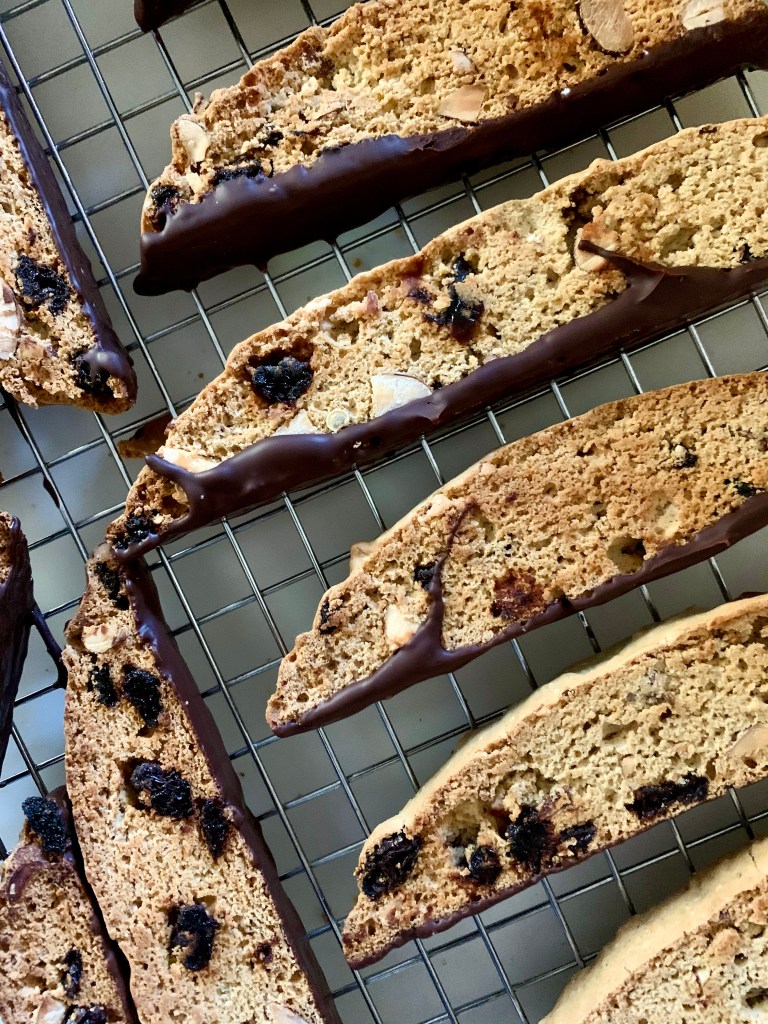
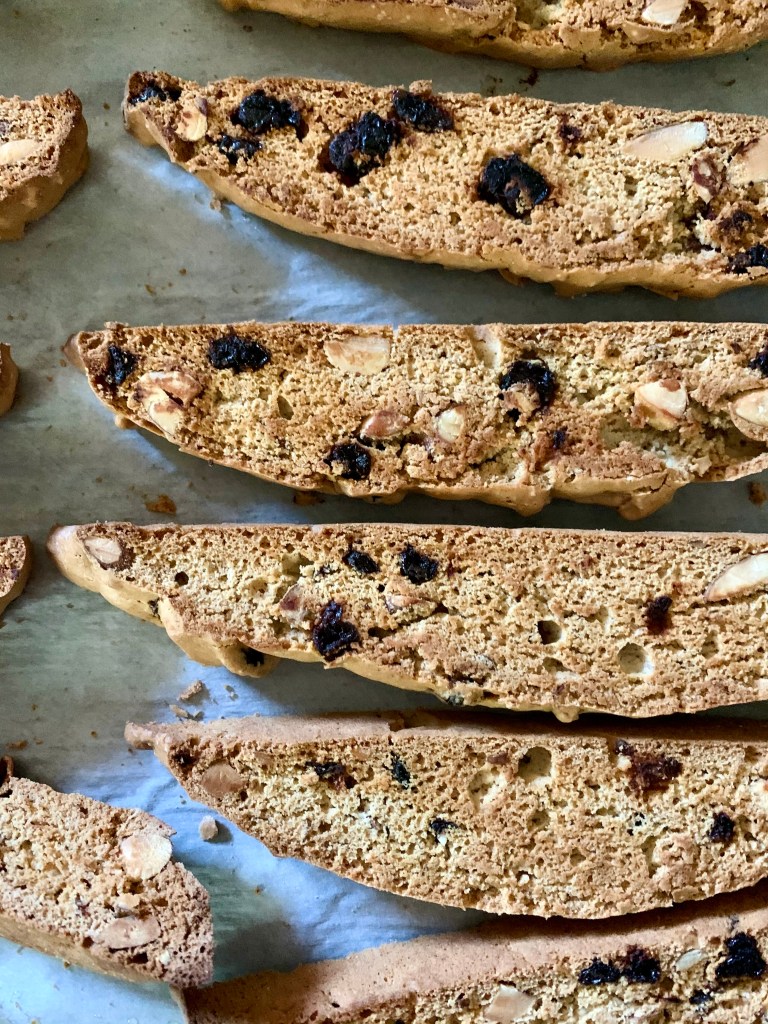
  • 2/3 cup dried cherries, diced
  • 1 cup roughly chopped roasted almonds (I buy raw, whole, almonds and roast them at 350 degrees for 15 minutes)
  • 1 cup of dark chocolate chips

Instructions:

  1. Preheat oven to 350 and line two baking trays with oiled parchment paper.
  2. In a large bowl, mix together flour, baking soda, baking powder, salt, and cinnamon
  3. In a smaller bowl mix together eggs, brown sugar, granulated sugar, vanilla and almond extract until smooth
  4. Fold wet mixture into dry mixture until well incorporated. The batter will be a thinner than a standard cookie dough.
  5. Fold in roasted almonds and dried cherries.
  6. Divide the batter evenly onto both baking trays and form into a long, flat rectangle (about 6 x 10 inches). I used a spatula to do this and to smooth the dough out a bit.
  7. Bake for 15 – 17 minutes until the top just starts to turn golden brown.
  8. Remove from oven and immediately cut on a slight diagonal into 1/2 inch slices. Place each slice back on the baking tray and bake for 10 minutes. Then flip the biscotti and bake again on the other side for an additional 10 minutes
  9. Allow the biscotti to cool completely then dip the bottom of each one in melted dark chocolate.
  10. Pair with your favorite dipping beverage and enjoy!

Beer Cheese Dip

Beer Cheese Dip

I recently came across Holidaily Brewing, a 100% gluten-free brewery in Colorado with incredible beer that is totally safe for celiacs. I absolutely love their IPA and their stout is the perfect, not-too-heavy, fall beer, but the real sleeper is their blonde ale which is mild but flavorful and perfect for cooking with.

As the weather in Chicago has suddenly started to feel like fall, and with football season right around the corner, I have been experimenting with some different comfort food snacks for during games and for outdoor get togethers with friends. I am always a big fan of recipes that are low mess, don’t require the oven and use ingredients that I am likely to have in the fridge at home. This beer cheese dip is all of those things and is a serious (socially distanced) crowd pleaser.

It is super cheesy with a little bit of spice and tanginess and the Holidaily Brewing Company blonde ale adds a perfect malty, hoppy flavor to balance everything out. I paired the dip with gluten-free pretzels but it would also go great with some warm bread or veggies. As we get further into fall, I have a feeling that this would also be delicious warmed up and paired with hot pretzels…it may just be something I try the next time I make it!

Ingredients: (Total Time: 10 minutes. Serves 6 ):

  • 8 oz. package of cream cheese
  • 1.5 cups shredded, sharp cheddar cheese
  • 1/2 cup Fage 2% Greek yogurt
  • 2 tbsp ranch seasoning mix
  • 1/2 cup Holidaily Brewing blonde ale (or any other blonde ale)
  • 1/4 tsp smoked paprika
  • 1/4 tsp cayenne pepper
  • 1 tsp Sriracha
  • 1/4 tsp Worcester sauce

Instructions:

  1. Add all ingredients to a food processor or high powered blender and blend until completely smooth.
  2. Serve with pretzels, chips, veggies, warm bread or anything else your heart desires.
  3. Enjoy!

Mini Pumpkin Cheesecakes

Mini Pumpkin Cheesecakes

I don’t care how basic it is. I love pumpkin everything. There, I said it and there’s no shame in my game. Lattes, bread, cookies, pasta, you name it and chances are I’ve made it and devoured it. But of all of the pumpkin treats I’ve made, these mini pumpkin cheesecakes are by far my favorite.

cupcakes-4.jpg

Unlike traditional cheesecake that is labor intensive, requires a water bath and takes forever to bake, these mini cheesecakes take 30 minutes in the oven, have a super simple ingredient list and bake in cupcake tins. So easy!

Processed with VSCO with c1 preset

We were having friends over for the Steeler’s game on Sunday so it seemed like the perfect opportunity to make a batch.

cupcakes-3.jpg

I’ve been making these for years with all sorts of flavor combinations using different fillings and cookies as the crust. For this batch, I used Goodie Girl’s seasonal Caramel Apple flavored cookies with pumpkin spice filling and whipped topping. They were to die for and the Goodie Girl cookies worked wonderfully. They had great crunch, and the caramel apple flavor added a really nice tart kick.

If your store doesn’t carry the caramel apple flavor, I think their toffee crunch or even chocolate chip cookies would work well also.

If you are looking for an easy fall treat that is perfect for parties, give these a try!

Ingredients (Prep Time: 15 min. TotalTime: 50 min. Serves: 15):

For the Crust:

  • 1 box Goodie Girl Caramel Apple Cookies (about 2 cups of crumbs)
  • 4 tbsp butter (melted)

For the Filling:

  • 12 oz. reduced fat cream cheese
  • 2 Tbsp. Greek yogurt
  • 1/2 cup sugar
  • 1 egg
  • 1 tsp vanilla extract
  • 1/2 tsp pumpkin spice
  • 1/4 cup pumpkin puree

For the Whipped Topping:

  • 1 cup heavy whipping cream
  • 4 oz reduced fat cream cheese
  • 1/4 cup sugar
  • 1/2 tsp. vanilla extract
  • 1/2 tsp. pumpkin spice
  1. Preheat the oven to 350 degrees. Line a cupcake pan with cupcake liners (you will need 15).
  2. In a food processor, pulse cookies until they are fine crumbs. Add in melted butter and pulse until well incorporated.
  3. Distribute cookie mixture among cupcake tins (about 2 tablespoons per tin) and press into the bottom. Bake for 5 to 7 minutes until they just start to brown.
  4. In a medium bowl, mix together cream cheese, greek yogurt, sugar, egg, vanilla and pumpkin puree until smooth.
  5. Distribute cheesecake mixture evenly among cupcake tins. Bake for 25 minutes until the middle isn’t jiggly and the top has browned a tiny bit. Once removed from oven, let them cool completely.
  6. In a medium mixing bowl, whip heavy cream until peaks just start to form. Then, mix in cream cheese, sugar, vanilla and pumpkin spice until they are well incorporated and smooth.
  7. Serve cheesecakes with a generous dollop of whipped topping and enjoy this delicious, seasonal treat!


Fall Inspired Skillet Chicken Pot Pie

Fall Inspired Skillet Chicken Pot Pie

Fall weather is officially here and I’m excited because I get to share the fall recipes I’ve been working on. As much as I love summer and warm weather, I also love the comfort food that comes with the season change.chebe-1.jpg

In my opinion, chicken pot pie epitomizes comfort food but can be a bit heavy. I decided to play around with a typical chicken pot pie recipe, lighten it up, and add in some fall flavors.

The filling is full of vegetables and is flavorful without being overly creamy. The crust is slightly more chewy than a typical pie crust, but I enjoy it because it feels more substantial and isn’t super oily.Processed with VSCO with c1 preset

This recipe is low mess since I made the filling in a large (12 inch) cast iron pan and threw the crust loosely on top before tossing it in the oven. If you don’t own a cast iron pan, you can still make this recipe by transferring ingredients into a pie dish and baking it.

I mentioned in a recent post that I’m working with Chēbē to create a few recipes using their baking mixes. I absolutely love their products because they’re versatile, grain free, and they taste great. I used their all purpose baking mix for the crust in this recipe and it worked wonderfully.

It was easy to work with and didn’t fall apart or crumble like some of the other crusts I’ve tried in the past. I have seen Chēbē products in Whole Food’s or you can order boxes through their website.

If you are looking for the perfect recipe to kick off fall with, give this a try!

Ingredients (Prep Time: 35 min. Total Time: 90 min. Serves: 6)

For the Crust:

  • 1 package Chēbē All Purpose Baking Mix
  • 1 tsp. baking soda
  • 3 Tbsp. cold butter, cut into tiny cubes
  • 2 eggs
  • 2 Tbsp. milk
  • 2 Tbsp. water
  1. In a medium mixing bowl whisk together Chēbē All Purpose Baking mix and baking soda.
  2. Using a fork, mash the butter into the flour mixture until it is crumbly and well incorporated.
  3. Add in eggs, milk and water and mix until stretchy and smooth. Form mixture into a ball. If the dough is a bit dry, add in more milk 1 Tbsp. at a time.
  4. Cut two large pieces of parchment paper and lay dough between them. Roll into a 12 inch round and place it in the freezer while you finish the filling portion of the recipe (leave it in between the parchment paper).

For the Filling:

  • 3 Tbsp. olive oil
  • 2 large carrots, diced
  • 1 large yellow onion, diced
  • 3 stalks celery, diced
  • 4 cloves garlic, minced
  • 2 Tbsp. fresh sage, minced
  • 3 cups butternut squash, cut into 1/2 inch cubes
  • 4 cups shredded kale
  • 1/4 cup gluten-free flour (I use cup4cup)
  • 1 rotisserie chicken, shredded (about 3 cups)
  • 4 cups chicken broth
  • Salt & Pepper to taste
  1. Preheat oven to 400 degrees.
  2. In a large skillet, heat oil over medium heat. Add in onions and sauté until they  start to soften, about 5 minutes. Once softened, add in garlic, sage, carrots, celery, and squash. Sauté until the celery begins to turn translucent, about 5 more minutes.
  3. Add in kale and sauté until it just starts to wilt. Sprinkle flour over the vegetables, stir until combined.
  4. Pour in chicken broth bring to a boil. Reduce to a simmer and stir constantly until it  the mixture begins to thicken up, about 5 minutes.
  5. Once thickened, turn off the heat and add shredded chicken.
  6. Remove dough from freezer and peel off parchment paper. Lay dough round over the top of the filling mixture in the skillet.
  7. Place the skillet in the oven and bake for 35 – 40 minutes until the crust is golden brown and the filling is bubbly.
  8. Remove from oven and allow the pie to cool for 15 minute before serving. Enjoy!

Chēbē Feta, Olive & Rosemary Focaccia

Several years ago, I tried Chēbē’s products at an expo and fell in love. The mix itself is free from pretty much every allergen, is vegan, and tastes wonderful. It is incredibly versatile and can be used in both sweet and savory recipes. I have recently partnered up with Chēbē and will be developing a few recipes with their products over the next couple of months.

Chebe 1.jpg

The first recipe I came up with is this Feta, Olive and Rosemary Focaccia. Since the dough is made with tapioca and there is cheese added to it, the bread is perfectly crispy on the outside while keeping a chewy texture inside.

Chebe 2.JPG

If you wanted to use this for sandwiches, I could see it being delicious with Italian meats, vinegar and spices. That being said, it’s packed with flavor on its own and I enjoyed it dipped in a bit of olive oil with a glass of red wine. I will warn you, it is incredibly addictive and it didn’t last 24 hours in our apartment before we finished the whole loaf (there are only 2 of us).

Chebe 3.jpg

If you are interested in trying out this recipe, I have seen Chēbē products in Whole Food’s or you can order boxes through their website.

I hope you enjoy this recipe as much as I did!

Ingredients (Prep Time: 15 min. Total Time: 60 min. Serves: 8):

  • 1 package Chēbē Focaccia Bread mix
  • 1/2 cup shredded mozzarella
  • 1/2 cup crumbled feta
  • 2 eggs
  • 2 Tbsp. olive oil
  • 1/2 cup pitted kalamata olives, diced
  • 1 Tbsp. fresh rosemary, minced
  • 4 Tbsp. milk

Optional Garnishes:

  • Thinly sliced lemon rounds
  • A few extra olives
  • Rosemary
  • A sprinkle of flaky sea salt and black pepper
  • Olive oil
  1. Preheat the oven to 375 degrees. Line a baking pan with parchment paper and lightly grease with 1 tsp. of olive oil.
  2. In a medium mixing bowl combine Chebe Focaccia bread mix, mozzarella, feta, eggs, olive oil, kalamata olives, rosemary and milk.
  3. Knead with your hands until everything is well incorporated and the mix is smooth, springy and dough like.
  4. Place dough on baking tray and press out into an oval shape, about 10 inches across at its widest point.
  5. Using your finger or the back of a spoon, poke 10 or 15 dents in the top of the dough.
  6. Brush the top of the focaccia with a bit of olive oil and top with lemon rounds, olives, feta, rosemary, salt and pepper.
  7. Bake for 40 – 45 minutes, let cool slightly and enjoy!