Pumpkin Mousse Parfaits

Pumpkin Mousse Parfaits

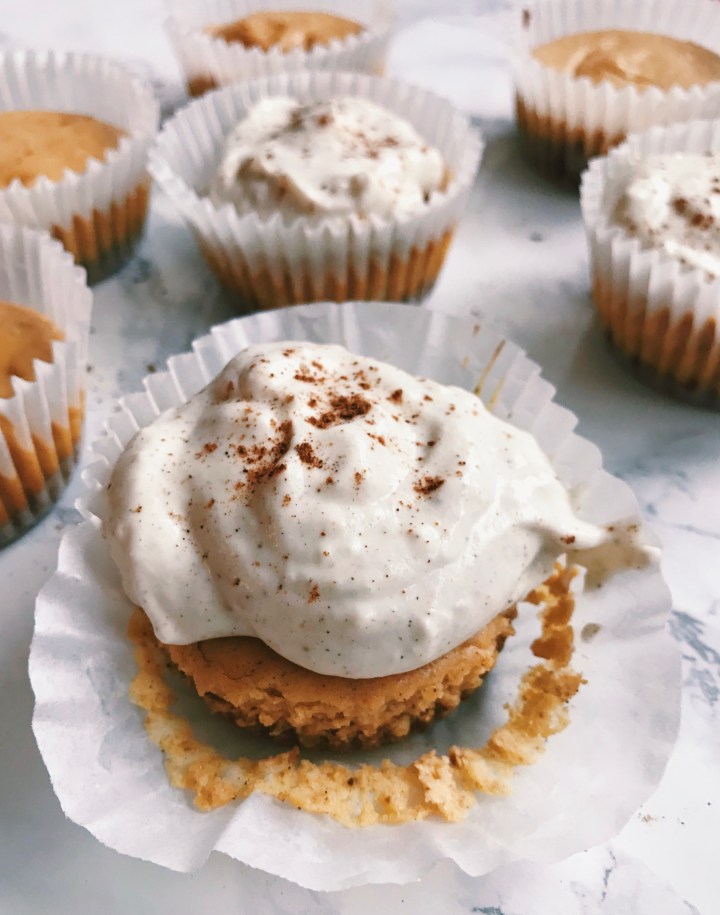
I am going to keep this post short and sweet. This is an incredibly easy, grain-free dessert that’s perfect for a fall date night treat. You won’t need to turn on your oven, or your stove and it only needs one bowl. I recommend refrigerating it for an hour or two before serving it because it needs some time to set and it tastes a lot better cold.

dessert 2

I layered the pumpkin mousse with pumpkin flavored Within/Without granola which made this taste like creamy pumpkin pie. I absolutely love their granola, it’s grain-free and has a unique chewy texture. The seasonal pumpkin flavor is amazing and I’ve been sprinkling it on everything I can lately. If you want to give it a try, out you can order it online here!

Dessert 1

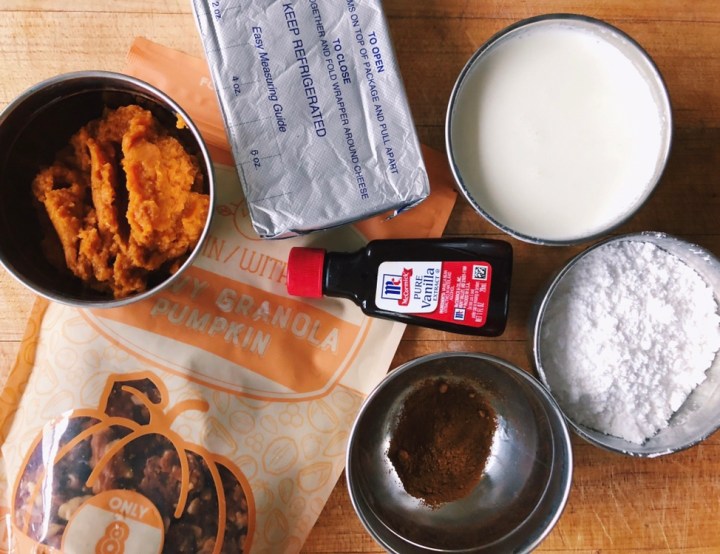
Ingredients (Prep Time: 10 min. Total Time: 60 min. Serves: 2):

  • 1 cup Within/Without Granola
  • 2/3 cup heavy cream
  • 4 oz. cream cheese
  • 1/2 cup powdered sugar
  • 1/4 cup pumpkin puree
  • 1 tsp vanilla
  • 1/2 tsp pumpkin spice
  1. Whip heavy cream until soft peaks form.
  2. Mix in cream cheese until well incorporated but mixture is still fluffy.
  3. Mix in pumpkin pureé, powdered sugar, vanilla and pumpkin spice.
  4. Layer 2 tbsp. granola followed by 1/4 cup mousse in small cups. Refrigerate until mixture has set and chilled, about 1 hour. Enjoy!


Mini Pumpkin Cheesecakes

Mini Pumpkin Cheesecakes

I don’t care how basic it is. I love pumpkin everything. There, I said it and there’s no shame in my game. Lattes, bread, cookies, pasta, you name it and chances are I’ve made it and devoured it. But of all of the pumpkin treats I’ve made, these mini pumpkin cheesecakes are by far my favorite.

cupcakes-4.jpg

Unlike traditional cheesecake that is labor intensive, requires a water bath and takes forever to bake, these mini cheesecakes take 30 minutes in the oven, have a super simple ingredient list and bake in cupcake tins. So easy!

Processed with VSCO with c1 preset

We were having friends over for the Steeler’s game on Sunday so it seemed like the perfect opportunity to make a batch.

cupcakes-3.jpg

I’ve been making these for years with all sorts of flavor combinations using different fillings and cookies as the crust. For this batch, I used Goodie Girl’s seasonal Caramel Apple flavored cookies with pumpkin spice filling and whipped topping. They were to die for and the Goodie Girl cookies worked wonderfully. They had great crunch, and the caramel apple flavor added a really nice tart kick.

If your store doesn’t carry the caramel apple flavor, I think their toffee crunch or even chocolate chip cookies would work well also.

If you are looking for an easy fall treat that is perfect for parties, give these a try!

Ingredients (Prep Time: 15 min. TotalTime: 50 min. Serves: 15):

For the Crust:

  • 1 box Goodie Girl Caramel Apple Cookies (about 2 cups of crumbs)
  • 4 tbsp butter (melted)

For the Filling:

  • 12 oz. reduced fat cream cheese
  • 2 Tbsp. Greek yogurt
  • 1/2 cup sugar
  • 1 egg
  • 1 tsp vanilla extract
  • 1/2 tsp pumpkin spice
  • 1/4 cup pumpkin puree

For the Whipped Topping:

  • 1 cup heavy whipping cream
  • 4 oz reduced fat cream cheese
  • 1/4 cup sugar
  • 1/2 tsp. vanilla extract
  • 1/2 tsp. pumpkin spice
  1. Preheat the oven to 350 degrees. Line a cupcake pan with cupcake liners (you will need 15).
  2. In a food processor, pulse cookies until they are fine crumbs. Add in melted butter and pulse until well incorporated.
  3. Distribute cookie mixture among cupcake tins (about 2 tablespoons per tin) and press into the bottom. Bake for 5 to 7 minutes until they just start to brown.
  4. In a medium bowl, mix together cream cheese, greek yogurt, sugar, egg, vanilla and pumpkin puree until smooth.
  5. Distribute cheesecake mixture evenly among cupcake tins. Bake for 25 minutes until the middle isn’t jiggly and the top has browned a tiny bit. Once removed from oven, let them cool completely.
  6. In a medium mixing bowl, whip heavy cream until peaks just start to form. Then, mix in cream cheese, sugar, vanilla and pumpkin spice until they are well incorporated and smooth.
  7. Serve cheesecakes with a generous dollop of whipped topping and enjoy this delicious, seasonal treat!


Fall Inspired Skillet Chicken Pot Pie

Fall Inspired Skillet Chicken Pot Pie

Fall weather is officially here and I’m excited because I get to share the fall recipes I’ve been working on. As much as I love summer and warm weather, I also love the comfort food that comes with the season change.chebe-1.jpg

In my opinion, chicken pot pie epitomizes comfort food but can be a bit heavy. I decided to play around with a typical chicken pot pie recipe, lighten it up, and add in some fall flavors.

The filling is full of vegetables and is flavorful without being overly creamy. The crust is slightly more chewy than a typical pie crust, but I enjoy it because it feels more substantial and isn’t super oily.Processed with VSCO with c1 preset

This recipe is low mess since I made the filling in a large (12 inch) cast iron pan and threw the crust loosely on top before tossing it in the oven. If you don’t own a cast iron pan, you can still make this recipe by transferring ingredients into a pie dish and baking it.

I mentioned in a recent post that I’m working with Chēbē to create a few recipes using their baking mixes. I absolutely love their products because they’re versatile, grain free, and they taste great. I used their all purpose baking mix for the crust in this recipe and it worked wonderfully.

It was easy to work with and didn’t fall apart or crumble like some of the other crusts I’ve tried in the past. I have seen Chēbē products in Whole Food’s or you can order boxes through their website.

If you are looking for the perfect recipe to kick off fall with, give this a try!

Ingredients (Prep Time: 35 min. Total Time: 90 min. Serves: 6)

For the Crust:

  • 1 package Chēbē All Purpose Baking Mix
  • 1 tsp. baking soda
  • 3 Tbsp. cold butter, cut into tiny cubes
  • 2 eggs
  • 2 Tbsp. milk
  • 2 Tbsp. water
  1. In a medium mixing bowl whisk together Chēbē All Purpose Baking mix and baking soda.
  2. Using a fork, mash the butter into the flour mixture until it is crumbly and well incorporated.
  3. Add in eggs, milk and water and mix until stretchy and smooth. Form mixture into a ball. If the dough is a bit dry, add in more milk 1 Tbsp. at a time.
  4. Cut two large pieces of parchment paper and lay dough between them. Roll into a 12 inch round and place it in the freezer while you finish the filling portion of the recipe (leave it in between the parchment paper).

For the Filling:

  • 3 Tbsp. olive oil
  • 2 large carrots, diced
  • 1 large yellow onion, diced
  • 3 stalks celery, diced
  • 4 cloves garlic, minced
  • 2 Tbsp. fresh sage, minced
  • 3 cups butternut squash, cut into 1/2 inch cubes
  • 4 cups shredded kale
  • 1/4 cup gluten-free flour (I use cup4cup)
  • 1 rotisserie chicken, shredded (about 3 cups)
  • 4 cups chicken broth
  • Salt & Pepper to taste
  1. Preheat oven to 400 degrees.
  2. In a large skillet, heat oil over medium heat. Add in onions and sauté until they  start to soften, about 5 minutes. Once softened, add in garlic, sage, carrots, celery, and squash. Sauté until the celery begins to turn translucent, about 5 more minutes.
  3. Add in kale and sauté until it just starts to wilt. Sprinkle flour over the vegetables, stir until combined.
  4. Pour in chicken broth bring to a boil. Reduce to a simmer and stir constantly until it  the mixture begins to thicken up, about 5 minutes.
  5. Once thickened, turn off the heat and add shredded chicken.
  6. Remove dough from freezer and peel off parchment paper. Lay dough round over the top of the filling mixture in the skillet.
  7. Place the skillet in the oven and bake for 35 – 40 minutes until the crust is golden brown and the filling is bubbly.
  8. Remove from oven and allow the pie to cool for 15 minute before serving. Enjoy!

Not-So-Classic Mac & Cheese

I’ve always considered Mac & Cheese an ultimate comfort foods However, as I got older, I started eating gluten-free and my taste buds evolved a bit and boxed mac and cheese lost its appeal.

Banza 2

I came up with a healthy gluten-free mac and cheese recipe using Banza noodles made from chickpeas. They are high protein and have a unique texture. I think they taste especially great in this mac & cheese recipe and add something interesting to it.

Banza 1

A fellow blogger recommended cooking the noodles in chicken broth for extra flavor which was a great idea. I also threw in some broccoli to cut down on the carbs a bit and add some extra veggies. However, that is totally optional and can be omitted. This is a great recipe for a healthier twist on classic Mac & Cheese that both kids and adults will enjoy. This recipe will make about 3-4 servings as a side dish or 2-3 servings as a meal.

Ingredients (Total time: 30 min. Serves: 8):

  • 1 box Banza Noodles
  • 2 cubes chicken bullion
  • 2 cups chopped broccoli florets
  • 2 Tbsp. butter
  • 2 Tbsp. gluten-free all purpose flour (I usually use Bob’s Red Mill)
  • 1 ½ cups 2% milk
  • ¼ tsp. paprika
  • ¼ tsp. garlic powder
  • ½ tsp. pepper
  • 1 ½ cup shredded cheddar
  • ½ cups shredded parmesan
  • extra salt and pepper to taste
  1. Cook noodles in a medium pot according to package directions, but throw 2 cubes of chicken bullion into the boiling water. Once cooked, drain, place back into pot and set aside.
  2. Steam broccoli until completely cooked, drain and place in pot with noodles.
    In a medium sauce pan over medium heat, melt butter and stir in flour. Let the mixture bubble for about 1 or 2 minutes stirring the entire time.
  3. Slowly add milk to flour mixture about ¼ cup at a time whisking the entire time. Once the sauce starts to thicken, add the next ¼ cup of milk. Repeat until you have added all the milk and until the sauce is nicely thickened. Continuing to whisk the entire time.
  4. Whisk in paprika and garlic powder. Once incorporated, add in all of the cheese and whisk until totally melted.
  5. Pour the cheese sauce over the noodles and broccoli and mix in cheese sauce.

Sweet Potato Crust Veggie Quiche 

Sweet Potato Crust Veggie Quiche 
There is nothing quite like a piece of buttery, delicious quiche. However, it’s generally a more heavy dish and I’ve found making a gluten-free pie crust to be fairly difficult. I fixed that by making a naturally gluten-free crust made of sweet potatoes.
IMG_9415

It turned out wonderfully and the sweet potatoes were a great substitute for a regular pie-crust. I am sure that you could experiment with this and try using potatoes as a crust instead of sweet potatoes. You can also be flexible as far as what you want to add to the egg mixture. Just try to keep the veggie ratios somewhat similar. I hope you like this recipe as much as I did!

Processed with VSCOcam with f2 preset

Processed with VSCOcam with f2 preset

Ingredients: (Prep Time: 30 min. Total time: 90 Min. Serves: 8):

  • 1.5 medium sweet potatoes
  • 1 tbsp. olive oi
  • 1/3 cup chopped onion
  • 2 cloves diced garlic
  • ½ cup chopped red pepper
  • 1/3 cup chopped zucchini
  • ½ cup sliced mushrooms
  • 2 cups chopped kale (remove stems)
  • 4 whole eggs
  • 4 egg whites
  • ¼ cup shredded parmesan cheese
  • ½ cup shredded cheddar (I used reduced fat)
  • 3 tbsp skim milk
  • ¼ tsp. dried oregano
  • 1/8 tsp. dried thyme
  • 1/8 tsp. crushed red pepper flakes
  • Salt & pepper to taste

Instructions:

1. Preheat the oven to 400 degrees and grease a pie dish with ½ tbsp olive oil.

2. Wash and peel the sweet potatoes. Then cut them into very thin slices, around 1/8 in. thick and layer them in the pie dish so that the bottom and the sides are covered. Place in the oven for 15 min until the sweet potatoes have softened slightly.

3. While the sweet potatoes are in the oven, in a large skillet over medium heat, heat the olive oil and sauté the onion, garlic and red pepper until slightly softened (about 3 minutes).

4. Then add the kale, mushrooms and zucchini to the pan. Sauté them very briefly (about 1 min), remove the pan from the heat and allow the vegetables to cool to about room temperature.

5. Whisk together eggs, milk, cheese, oregano, red pepper flakes, salt and pepper.

6. Add cooled vegetables to the egg mixture and stir until combined. Pour the mixture into the pie dish with sweet potatoes.

7. Reduce oven heat to 350 degrees and bake the quiche for 45 minutes or until the middle of the quiche does not jiggle.

8. Remove from oven, allow it to cool slightly before serving (about 15 min). Enjoy!